最近换了服务器,想用php7+的环境去部署一些新的开源程序,但迫于有几个PHP5.6环境写的网站程序还要使用,如果升级到PHP7则要从程序上改好多地方让PHP5.6的程序运行正常,于是想试试windows+nginx+php多版本,于是开始学习研究nginx的配置方法,现学习成果如下:
一、安装环境:
我的服务器是windows server 2012,那么下载就要相应的windows版本的
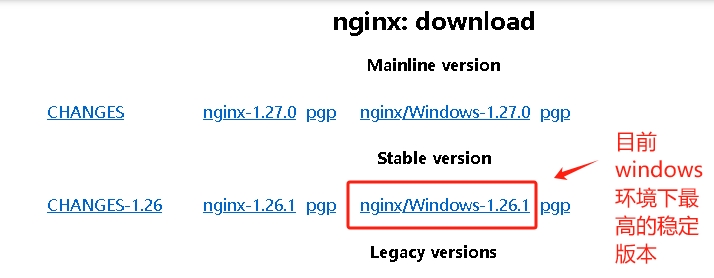
1、下载nginx:到http://nginx.org/en/download.html下载windows版本,注意一定要下载稳定版,即Stable version版本的。
2、下载PHP,
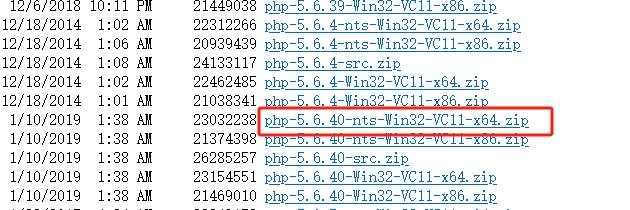
下载PHP5.6及PHP7.4,本文以此两个版本为例,因为我这次所有的网站环境只需要这两个就可以运行,无需其他版本,以后如果需要也可以按此文下载配置虽的版本。这里是php所有版本的下载地址:https://windows.php.net/downloads/releases/archives/,我下载的是以下版本,注意请选择nts的版本,和nginx配合运行会更快。

3、解压nginx+php多版本包准备好环境文件
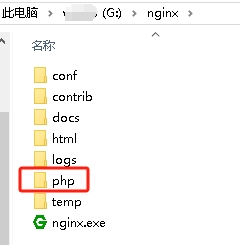
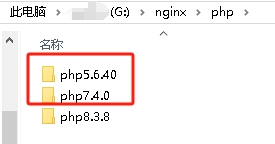
解压nginx到某个盘的根目录下,在nginx下建一个php目录,将下载完成的php5.6和php7.4的包复制进来并解压,分别两个版本中的php.ini-production复制一份文件名改成php.ini,运行程序需要什么样的扩展、配置可以编辑修正。
二、配置windows+nginx+php多版本环境
1、修改nginx配置文件
打开conf/nginx.conf,重点对如下部分进行修改:
#user  nobody;
worker_processes  1;

#error_log  logs/error.log;
#error_log  logs/error.log  notice;
#error_log  logs/error.log  info;

#pid        logs/nginx.pid;


events {
    worker_connections  1024;
}


http {
    include       mime.types;
    default_type  application/octet-stream;

    #log_format  main  '$remote_addr - $remote_user [$time_local] "$request" '
    #                  '$status $body_bytes_sent "$http_referer" '
    #                  '"$http_user_agent" "$http_x_forwarded_for"';

    #access_log  logs/access.log  main;

    sendfile        on;
    #tcp_nopush     on;

    #keepalive_timeout  0;
    keepalive_timeout  65;

    #gzip  on;

    server {
        listen       80;
        server_name  www.web1.com web1.com;

        #charset koi8-r;

        #access_log  logs/host.access.log  main;

        location / {
            root   g:\webs\web1.com;
            index  index.html index.htm index.php;
        }

        #error_page  404              /404.html;

        # redirect server error pages to the static page /50x.html
        #
        error_page   500 502 503 504  /50x.html;
        location = /50x.html {
            root   g:\webs\web1.com;
        }

        # proxy the PHP scripts to Apache listening on 127.0.0.1:80
        #
        #location ~ \.php$ {
        #    proxy_pass   http://127.0.0.1;
        #}

        # pass the PHP scripts to FastCGI server listening on 127.0.0.1:9000
        #
        location ~ \.php$ {
            root           g:\webs\web1.com;
            fastcgi_pass   127.0.0.1:9740;
            fastcgi_index  index.php;
            fastcgi_param  SCRIPT_FILENAME  $document_root$fastcgi_script_name;
            include        fastcgi_params;
        }

        # deny access to .htaccess files, if Apache's document root
        # concurs with nginx's one
        #
        #location ~ /\.ht {
        #    deny  all;
        #}
    }


      server {
        listen       80;
        server_name  www.web2.com web2.com;

        #charset koi8-r;

        #access_log  logs/host.access.log  main;

        location / {
            root   g:\webs\web2.com;
            index  index.html index.htm index.php;
        }

        #error_page  404              /404.html;

        # redirect server error pages to the static page /50x.html
        #
        error_page   500 502 503 504  /50x.html;
        location = /50x.html {
            root   g:\webs\web2.com;
        }

        # proxy the PHP scripts to Apache listening on 127.0.0.1:80
        #
        #location ~ \.php$ {
        #    proxy_pass   http://127.0.0.1;
        #}

        # pass the PHP scripts to FastCGI server listening on 127.0.0.1:9000
        #
        location ~ \.php$ {
            root           g:\webs\web2.com;
            fastcgi_pass   127.0.0.1:9564;
            fastcgi_index  index.php;
            fastcgi_param  SCRIPT_FILENAME  $document_root$fastcgi_script_name;
            include        fastcgi_params;
        }

        # deny access to .htaccess files, if Apache's document root
        # concurs with nginx's one
        #
        #location ~ /\.ht {
        #    deny  all;
        #}
    }
以上配置文件就是两个不同域名的网站用FCGI的方式分别用php5.6和php7.4运行,特别注意fastcgi_pass 127.0.0.1:9564后面的端口,这是后续我们在运行PHP fcgi模式时需要指定的端口,nginx需要连接的。
三、运行windows+nginx+php多版本环境
1、运行nginx
打开windows命令窗口,进入nginx的目录并启动nginx: start nginx,一闪而过没有错误提示就代表配置文件没有问题即启动成功。
2、运行多个版本的php fcgi模式:
运行php5.6:打开一个新的windows命令窗口:运行:g:/nginx/php/php5.6.40/php-cgi.exe -b 127.0.0.1:9564 -c g:/nginxphp/php5.6.40/php.ini,注意本人的php是安装在这个目录的,你的php装在什么目录请自行修改成你的相应目录。运行后无错误代表配置无误,不要关闭窗口。
运行php7.4:打开一个新的windows命令窗口:运行:g:/nginx/php/php7.4.0/php-cgi.exe -b 127.0.0.1:9740 -c g:/nginx/php/php7.4.0/php.ini,同样你的PHP安装在什么目录请自行修改成你的相应目录。运行后无错误代表配置无误,不要关闭窗口
如果以上运行无错误代表windows+nginx+php多版本环境配置成功了。再也不用考虑和担心PHP5.6版本需要改程序兼容高版本的问题了。更多细节优化欢迎交流。
以下有几个坑在我配置环境中遇到的,同时给出解决办法
1、css和jss文件加载不了,网页格式是混乱的,网上搜索到的一些解决办法均无效,解决办法就是下载最新的nginx稳定版,用其提供的nginx.conf改配置。
2、访问不到php页面:在默认的设置是fastcgi_param SCRIPT_FILENAME /$fastcgi_script_name;修正为fastcgi_param SCRIPT_FILENAME $document_root$fastcgi_script_name;
3、某些访问量大的网站过几分钟php-cgi就崩溃闪退了:把上面php-cgi命令注册成服务,方便大家快解决提供一个nssm程序给大家使用,下载地址:https://www.nssm.cc/download,下载后运行nssm install 服务名,以上面php7.4为例:nssm install php740,这样就会弹出界面,选中PHP7.4.0的目录文件下的php-cgi.exe,最下面输入运行参数。如图所示:
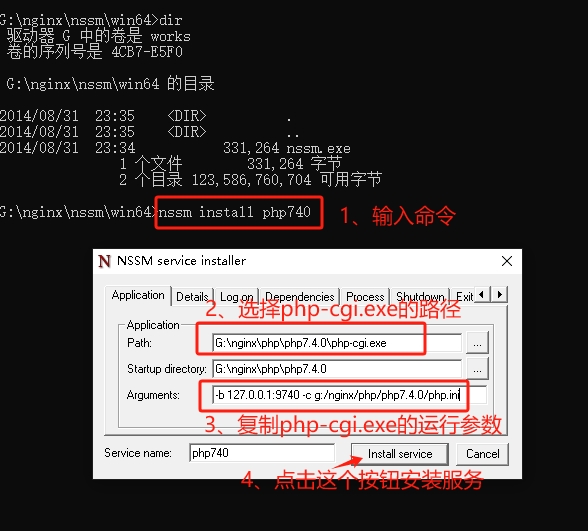
安装完成后可以到windows系统服务中找到php740启动,并设置为自动启动,这样就完美解决php-cgi一会就崩溃闪退的问题。同时又可以做到php740以服务的方式启动,下次重启服务器也不用自己手动运行。